To make Kumiko, you'll need some jigs. The number and type of jigs depend heavily on the pattern you want to create, as well as the angles required on the filler pieces and the type of grid you want to use. In this article, I'll show you the jigs for the Asanoha pattern in a square grid, as it's one of the most common patterns and a good starting point for beginners. I started with it, too.

The Asanoha consists of a long diagonal filler piece (b), two smaller filler pieces (c) and a small piece (d) that fixes everything in place.
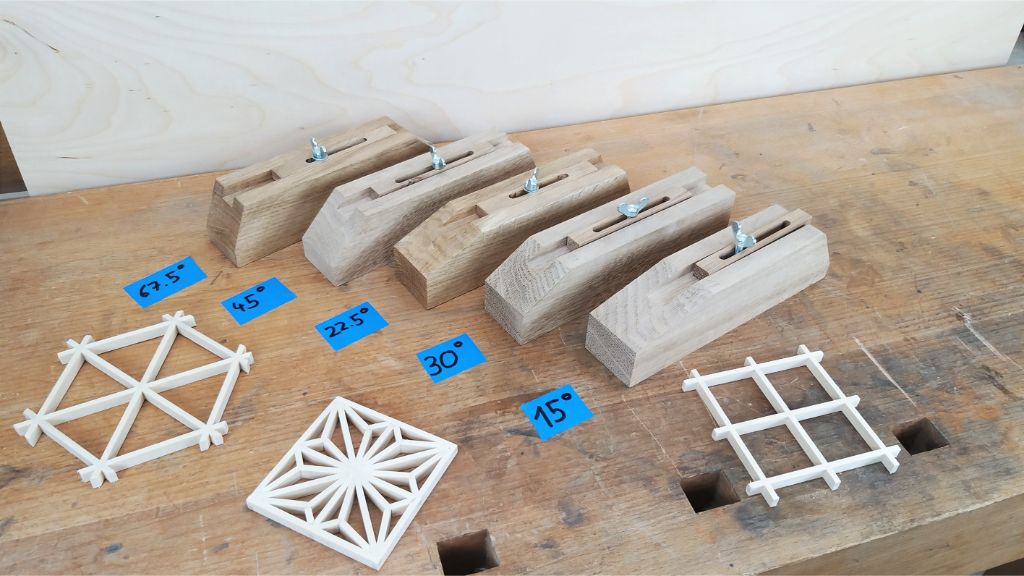
To ensure the pieces fit together perfectly, they must be cut at the following angles:
a: 90-degree overlap
b: 45-degree bevel on each side
c: 22.5 degrees and 67.5 degrees
d: 45 degrees on each side
The grid can be cut in several different ways. There are two common methods: with a Japanese pull saw and a narrow chisel, or on a table saw with a jig similar to a finger jointer.
I like the table saw method. It's fast, accurate, and repeatable. There is one drawback, however. The thickness of your strips must match the thickness of your sawblade. You can see my jig in the picture below. The small pin protruding from the stop is the same thickness as the grid.
Note: The triangular grid (Mitsukude) is cut with a different template, but according to the same principle.
My preferred method for cutting the small bevels on the filler pieces is using a template made in the workshop and a sharp chisel.
The devices are basically just a miter box with an adjustable stop, where the filler pieces protrude on one side and the excess is removed with the chisel.
The jigs are made of hardwood (I like oak for this). They measure approximately 50 mm (2") by 45 mm (1 3/4") and have a groove in the center that's 8 mm deep and 12 mm (1/2") wide. The angles at the end correspond to the angles you'll need for your pattern.
The stop is fixed with a wing screw that runs into a ramp sleeve.
For the asanoha, I like to make just two blocks with one angle on each side. Therefore, the angle between the same block and another is important. You should have one template at 45 degrees plus 67.5 degrees and the second at 22.5 degrees plus 67.5 degrees on the other end. This makes cutting the smaller filler pieces (c) much easier, as you can adjust the two blocks at the 67.5-degree angle to different lengths. For more on how to create the asanoha pattern, watch my video below.

If you decide to build your own jigs, make sure the angles are accurate and the stop can be adjusted to the length you need depending on the size of the grid.
This is how I build the jigs
I start by planing an oak board to 45 mm (1 ¾”) thick and then sawing down strips of just over 50 mm (2”). The next step is to run them through the planer one more time to get perfect 45 mm (1 ¾”) by 50 mm (2”) strips. To cut the mortise, I use a flat-tooth saw blade and make several cuts until the mortise is about 12 mm (½”) wide. A trick I like to use is to rotate the strips 180 degrees between passes. This allows you to make two cuts with each cross-cut stop position and saves time setting up the stop.
After cutting the groove, I plane a few more strips to fit the groove. They should fit snugly. The height isn't that important. I let them extend slightly beyond the groove so they're easier to adjust when cutting the pattern. You'll also end up with a 5 mm (3/16") groove in the center for the wing screw to go through.
The main body of the jig has a hole drilled in the center. The depth depends on the threaded inserts you use and the length of the screws. After inserting the inserts, I apply a light coating of oil to protect them.
Ta-da, the Kumiko jigs are finished and ready to build something beautiful.
Get your own Kumiko Jigs now!
In my shop, I have ready-made jigs and Kumiko kits. These make getting started with Kumiko crafting easier than ever before.